Saturday, February 19, 2011

How To Make A Rosette Neckline Accent


I wanted to show you how I  made the rosettes for the dress form bodice. If you missed it, you can see how I made the dress form here.
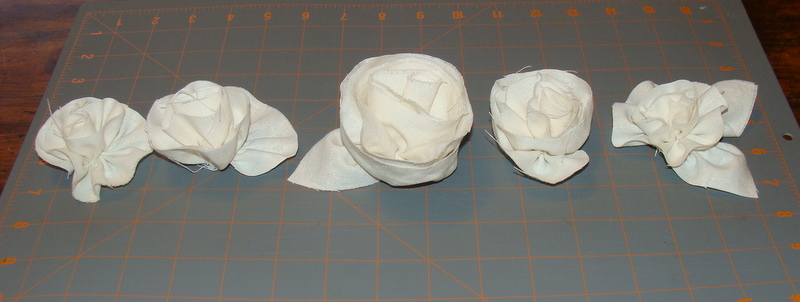

The rosette neckline was made from five rosettes in graduated sizes.  The center rosette being the largest. 


I start with a strip of fabric and round the edges.  I left the edges raw.  I wanted an aged, ragged look.  The strip for the center rose was 2 inches wide and 21 inches long. The rosettes on either side of the center were 1 1/2 inches wide and the smallest rosettes on the end were 1 1/4 inches wide.


I hand gather the straight edge....


And then roll up, stitching the bottom as I go.


The leaf is just a triangle, about 2 inches on the short sides and 4 inches on the long side.


Again, I just hand gather the long side...


And you have a leaf.


I sewed the leaves onto the rosettes, and then sewed the rosettes onto the bodice.


I used this same method for the rosette on my hanging lamp shade.


The only difference was that I did not want a raw edge. I cut out a strip of fabric twice as wide as I wanted the rosette and folded it in half.


I rounded the edges and with right sides together and sewed them on my machine.


I then turned it right side out and followed the same steps as for the other rosettes.


One of the comments on my dress form post was that the rosette neckline would make a good necklace.  I thought that was a great idea.

I hope you try making some rosettes, if you haven't already.  I'm always looking for a place to add another one. And go visit the link parties on my sidebar for more ideas.

Janet

Tuesday, February 15, 2011

Are You A Pinkster?

I know I am. I dream in pink. I had to contain a little squeal of delight when I saw the cover of the latest issue of House Beautiful magazine.


Don't you just love the affirmation of seeing your favorite decorating color on the cover of a magazine?  Of course all the pink rooms are very sophisticated and beautiful, not at all Barbie-like.


Just look at all those pinks.  I could never pick a favorite.

There was a wonderful article called confessions of a born-again pinkster by Carol Prisant.

"Pink is expressive.  Pink is eccentric.  Pink is witty.  Pink is wonky.  Pink is good for the heart.  Pink is so...pink!!"

She also says that "Pink takes guts".

I wish I had the "guts" to do pink walls.  I know I would love them.

Don't worry if you're not a pinkster.  There was something for just about everyone in the magazine.


All red and white and weathered.


Soothing whites.  Love that dress form.

So tell me.  What is your favorite color to decorate with?  Do you use it with "guts" or are you a little bashful, like me?

Friday, February 11, 2011

Dress Form Made From Recycled Paper Grocery Bags


I was so excited when the store where I work decided to get rid of these forms and I was allowed to take them home.  There were two of them. Not really my style, but I could see the possibilities,  unlike my ever encouraging family that exclaimed, "What are you going to do with those?"  and what they really meant was, "Oh no,  more junk."


Speaking of junk, I have a lot of unused things hanging around.  I've had this coat rack for years, used it here and there, but never loved it anywhere.  I thought it would make the perfect base for my dress form.


I cut off the top and added this plumbing hardware to fit into the metal tube of the form base.


Perfect!


Now I needed to make it a "dress" form.  I added a hardware cloth shaped skirt and duct tape to make a smooth transition. 


Finally, the fun part.  I used paper grocery bags torn into sheets and tea stained  like I did here with sheet music.  Here they are, hanging by the fireplace to dry.


After drying I crumpled the paper (actually I talked my family into crumpling the paper while watching TV, so I guess they can be supportive after all).  I took dark brown Briwax and lightly rubbed it on the paper, highlighting the crinkles.


The paper was then torn into smaller pieces and applied to the form with decoupage medium.


Layer after layer after layer...until


Ta Da!


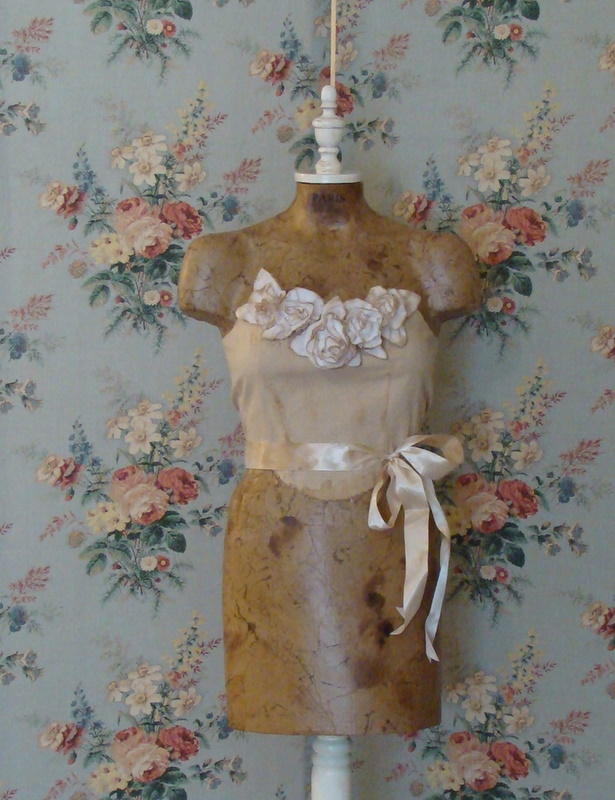
I have to say, I really loved the way this turned out, but...after I looked at her for a while, her shape was just too realistic and "naked". A little clothing was in order.


I made this top to resemble an old dress bodice.  It is tea stained of course, and embellished with a rosette neckline.  I'll share how I made this in another post. 


I didn't want to cover too much of  my hard work, so I kept it simple.


Oh! And did you notice the Paris address at the neck?


I used an address I found at the Graphic Fairy.  I just printed it on to the brown paper, and applied with the decoupage medium.


This whole project cost about $15 in supplies.  Not bad for an antique Parisian dress form. (I can pretend, right?) Now I just need to finish the corner of my bedroom that is going to be her permanent home.

Please visit all the link parties on my sidebar and come back for the next project. 

Janet

Sunday, January 23, 2011

Vanity Stool and Mirror Makeover

Add a pinch of pink to the recipe and you have a soft and romantic dressing table.


I found this stool and mirror at my favorite resale shop last fall. Under twenty dollars for the pair.  (more on that screen later)


I painted the stool creamy white, and recovered the seat.  This is what the seat looked like when I took the top layer off.


It was in pretty bad shape, very dirty, and a bit smelly.  So I stripped it down to the board and added a new piece of upholstery foam.


For me, the best part of the project was this beautiful vintage-look fabric.


And I couldn't resist painting the mirror my favorite shade of pink-Glidden pink ballet slipper.

Before...


And after.


I'm planning on adding lamps with ruffled shades (I think) and a few vintage accessories that I have yet to find.

So there  you have it -  my first completed project since before Thanksgiving.  It feels  good to be back in "project mode".  Thanks for sharing it with me.

Go visit all the parties I'll be joining.  You can find the list on my sidebar.

Until the next project,

Janet

Sunday, December 19, 2010

Merry Christmas

I just wanted to take a minute to wish everyone a Merry Christmas.


There's only been a tiny bit of decorating at my house.  I have wonderful memories of my days as a stay at home mom...the decorating, the baking, making gingerbread ornaments with my kids, all the classroom parties at school...Now I work retail.  Do stores really need to open at three o'clock in the morning and close at midnight? 


Since I wasn't able to blog during the Christmas season, I am looking forward to the new year and lots of new projects.


I hope you make lots of wonderful memories with your family.


Merry Christmas to you all!

Janet